Table of Contents
ToggleHeating a tiny house efficiently without eating up precious square footage is a challenge every downsizer faces. A wood stove for tiny house living offers off-grid capability, radiant warmth, and a real fire’s ambiance, all in a compact footprint. But not every wood stove works in a space where every inch counts, and installing one incorrectly can mean code violations, insurance headaches, or worse. This guide walks through selecting, installing, and maintaining a tiny house wood stove that keeps you warm, safe, and code-compliant in 2026.
Key Takeaways
- A tiny house wood stove provides off-grid heating capability, radiant warmth, and energy independence without requiring utility hookups, making it ideal for downsizers in rural or remote locations.
- EPA-certified wood stoves burn cleaner and more efficiently while reducing creosote buildup; prioritize models with built-in heat shields to meet strict clearance requirements in compact spaces.
- Select a stove sized to your actual square footage (8,000–15,000 BTUs for 200 sq ft) with manageable firebox depth; oversized models force inefficient smoldering burns and creosote accumulation.
- Professional installation and code compliance are essential—improper setup risks insurance voidance, fire hazards, and inspection failures; budget $500–$1,200 for labor or $1,500–$3,000 for complete DIY installation.
- Regular maintenance including weekly glass cleaning, monthly chimney inspections, and annual gasket replacement prevents dangerous creosote buildup and keeps your tiny house wood stove burning safely and efficiently.
- Total first-year costs range from $2,500–$4,500 with professional installation; wood stoves are most economical in regions with affordable firewood access and cold climates requiring sustained heating.
Why Choose a Wood Stove for Your Tiny House?
Wood stoves aren’t just romantic, they’re practical heat sources for spaces under 400 square feet. Unlike propane or electric heaters, a wood stove requires no utility hookup, making it ideal for off-grid builds or rural locations where electricity costs run high.
Energy independence is the biggest draw. A cord of seasoned hardwood (roughly 128 cubic feet) can heat a well-insulated tiny house through most winters, depending on climate. In regions with abundant firewood, fuel costs drop to nearly zero if you source and split your own.
Radiant heat from a wood stove warms objects and people directly, not just air. This makes a 200-square-foot space feel comfortable at lower ambient temperatures compared to forced-air systems. You’ll notice the difference on cold mornings, no waiting for ducts to warm up.
Zoning flexibility matters in tiny living. A wood stove creates a heat zone you control with dampers and fuel load, unlike central systems that treat the whole house as one thermostat setting. Builders focusing on energy-efficient building principles often pair wood stoves with thermal mass floors or soapstone mantles to store and slowly release heat overnight.
That said, wood stoves demand active participation. You’re chopping, stacking, loading, and cleaning. If you’re away for days at a time or prefer set-it-and-forget-it heating, propane or mini-splits might suit you better.
Key Features to Look for in a Tiny House Wood Stove
Not all wood stoves shrink gracefully. Standard residential models often exceed 30 inches in width and kick out 40,000+ BTUs, way too much for a tiny house. Look for stoves purpose-built or adaptable for small spaces.
EPA certification is non-negotiable. Modern EPA-certified stoves burn cleaner (less than 2.5 grams of particulate per hour) and extract more heat from each log, meaning less wood consumption and fewer chimney creosote deposits. Older, non-certified stoves can fail local air quality ordinances and void insurance.
Clearance requirements shrink your usable space fast. Most wood stoves need 36 inches of clearance from combustible walls without heat shields. In a tiny house, that’s unworkable. Prioritize models with built-in heat shields or those approved for 12- to 18-inch clearances with aftermarket shielding. Check the stove’s ANSI/UL listing for exact specs, these aren’t suggestions: they’re code.
Cook-top capability adds function. Many compact stoves feature flat tops suitable for a kettle or cast-iron skillet, turning your heat source into a backup cooking surface during power outages or off-grid living.
Size and Heat Output Considerations
BTU output should match your square footage and insulation quality. A well-insulated 200-square-foot tiny house typically needs 8,000–15,000 BTUs per hour. Oversized stoves force you to run them smoldering-low to avoid overheating, which creates creosote buildup and inefficient burns.
Measure your available floor space in actual dimensions, not wishful thinking. A stove with an 18×20-inch footprint sounds small until you add the required floor pad (extending at least 18 inches in front of the door) and clearances. Sketch it out on graph paper first.
Firebox depth determines log length. Tiny stoves often max out at 10- to 12-inch logs. If you’re cutting your own wood, that’s fine. If you’re buying, confirm your supplier sells short splits, standard firewood is typically 16 inches.
Weight matters in trailer-based tiny houses. A cast-iron stove can weigh 150–300 pounds: add the chimney, floor pad, and heat shields, and you’re looking at 400+ pounds concentrated in one spot. Consult your trailer’s tongue weight and axle ratings. Placing the stove over the axles distributes load better than mounting it in the loft or extreme rear.
Top Tiny House Wood Stove Options for 2026
Several models dominate the tiny house market in 2026, balancing size, output, and clearances.
Dickinson Newport (solid fuel) is a marine-grade stove built for tight quarters, boats and RVs, making it a natural fit for tiny houses. It outputs roughly 8,000 BTUs, features a 10-inch firebox, and weighs under 40 pounds. The marine pedigree means excellent build quality, but the small firebox requires frequent reloading (every 2–3 hours).
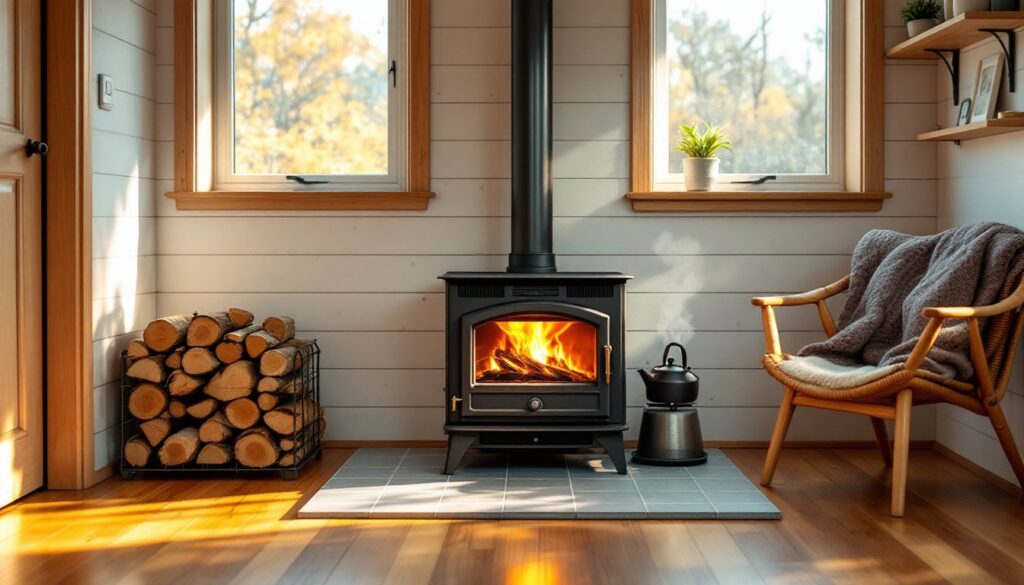
Cubic Mini Grizzly remains popular for its 14,000 BTU output and 12-inch log capacity. The Grizzly includes a built-in heat shield on the back, reducing rear clearance to 6 inches with an optional side shield kit. At around 100 pounds, it’s manageable for most trailer builds. The glass door lets you monitor the fire without opening it, preserving heat.
Dwarf 3kW and 4kW models from the UK offer ultra-compact footprints (under 16 inches wide) and outputs of 10,200–13,600 BTUs. These stoves ship with clearance-reducing legs and rear shields. Availability in the U.S. has improved, but replacement parts still require international shipping in some cases.
Unforgettable Fire Babe is a budget-friendly option for DIYers comfortable with a learning curve. It’s a simple firebox without fancy air controls, but at under $300, it’s accessible for first-time builders. Pair it with a quality stovepipe and damper for better burn control.
All these models work best with seasoned hardwood (oak, maple, ash) at below 20% moisture content. Wet or green wood smokes excessively, clogs chimneys, and reduces heat output. Invest in a moisture meter, $15 well spent.
Installation Tips and Safety Requirements
Installing a wood stove in a tiny house isn’t a Saturday afternoon project. It requires precision, code compliance, and often a building permit. Check local ordinances before buying: some jurisdictions treat tiny houses on wheels as RVs (NFPA 1192), while others apply IRC residential standards.
Floor protection starts with a non-combustible pad extending at least 18 inches in front of the stove door and 8 inches on other sides. Common options include 1/4-inch steel plate over cement board, Type X drywall with tile, or commercial hearth pads rated for your stove’s weight and BTU output. The pad must fully cover the area where embers could land.
Wall clearances compress in tiny houses using heat shields. A 1-inch air gap between the shield and wall (created with ceramic spacers) allows convective cooling. Acceptable shield materials include 24-gauge sheet metal, cement board, or mineral board. Never use standard drywall as a shield, it’s combustible under sustained radiant heat.
Chimney installation is where most DIYers should call a professional. Use Class A double-wall chimney pipe (not single-wall stovepipe) through the roof penetration. The chimney must extend at least 3 feet above the roof and 2 feet higher than anything within 10 feet (the 3-2-10 rule). Seal roof penetrations with a proper flashing kit and high-temp silicone.
Support the chimney at the roof line with a support bracket, don’t let the stove bear the full weight. In mobile builds, secure the stove to the floor with bolts or brackets to prevent shifting during travel.
Safety gear during installation includes gloves, safety glasses, and a respirator if cutting cement board. Once operational, keep a Class ABC fire extinguisher within reach and install a carbon monoxide detector near sleeping areas. Battery-powered models work best in off-grid setups.
Many small space living ideas focus on aesthetics, but in a tiny house, function and safety trump style. A poorly installed stove can void your insurance, fail inspection, or cause a house fire.
Maintaining Your Tiny House Wood Stove
A clean stove burns hotter, safer, and longer. Maintenance isn’t optional, it’s how you avoid chimney fires and keep efficiency high.
Daily tasks include removing ash before it blocks air intake. Let ash cool completely (12+ hours), then scoop into a metal bucket with a lid. Don’t use a vacuum unless it’s rated for ash, fine particles can ignite inside standard shop vacs.
Weekly (during burn season), check the glass door for creosote buildup. A thin brown film is normal: thick, black, crusty deposits mean you’re burning too cool or using wet wood. Scrape it off with a razor blade or use a specialty glass cleaner rated for stove glass.
Monthly chimney inspections catch problems early. Shine a flashlight up from the stove with the door open and down from the roof. Look for creosote deposits thicker than 1/8 inch, stage 2 (flaky) or stage 3 (glazed, tar-like) creosote requires immediate professional cleaning. DIY chimney brushes work for light maintenance, but glazed creosote often needs chemical treatment or professional rotary tools.
Gasket replacement is an annual task. Door and glass gaskets compress over time, letting air leak and reducing burn control. Peel out the old gasket, clean the channel with a wire brush, and install a new fiberglass rope gasket (typically 5/8-inch) using high-temp adhesive. The dollar-bill test checks the seal: close the bill in the door: if you can pull it out easily, the gasket’s shot.
End-of-season deep clean means pulling out all internal baffles (if removable), vacuuming the firebox, and inspecting the chimney cap for blockages (bird nests, leaves). Chimney caps with spark arrestors are smart in wooded areas but can clog faster, check them twice per season.
Schedule a professional chimney sweep annually, even if you clean regularly. They’ll inspect the chimney liner for cracks, check flashing seals, and catch issues you might miss.
Cost Breakdown: What to Expect
Budgeting for a wood stove installation in a tiny house involves more than the stove’s sticker price. Here’s a realistic breakdown for 2026.
Stove cost: Entry-level models start around $250 (Unforgettable Fire), mid-range options (Cubic Mini) run $600–$900, and premium marine-grade stoves (Dickinson Newport) reach $1,200–$1,800.
Chimney and pipe: Class A double-wall chimney sections cost $100–$150 per foot. A typical tiny house installation uses 6–10 feet of chimney pipe, plus a roof support bracket ($50–$80), flashing kit ($60–$120), and chimney cap ($40–$100). Budget $800–$1,500 for a complete chimney system.
Floor protection and heat shields: A DIY hearth pad using cement board and steel plate runs $80–$150. Commercial hearth pads cost $150–$400 depending on size. Wall heat shields add another $50–$150 in materials.
Installation labor: If hiring a professional, expect $500–$1,200 for stove and chimney installation, varying by region and complexity. Mobile tiny houses cost more due to securing components for travel.
Permits and inspections: Building permits range from $50–$200. Some jurisdictions require a final inspection by a certified inspector ($100–$250).
Annual operating costs: Firewood prices vary wildly, $150–$350 per cord in most U.S. regions. A tiny house burning efficiently might use 1–2 cords per winter. Add $100–$200 annually for chimney cleaning, gaskets, and maintenance supplies.
Total first-year cost (DIY installation): $1,500–$3,000. Professional installation pushes that to $2,500–$4,500. Compare this to installing a propane system ($1,000–$2,000 upfront, plus $300–$600 annual fuel) or a mini-split heat pump ($2,000–$4,000 installed, plus electric costs).
Wood stoves shine in regions with cheap or free firewood access. If you’re buying all your fuel in an urban area, the economics tilt toward electric or propane. Many farmhouse decor enthusiasts embrace wood stoves for aesthetics, but crunch the numbers based on your actual heating season and fuel availability.
Insurance implications matter. Some carriers charge higher premiums for wood heat or exclude coverage entirely. Confirm your policy before installation, documentation of professional installation and annual inspections can help negotiate better rates.