Table of Contents
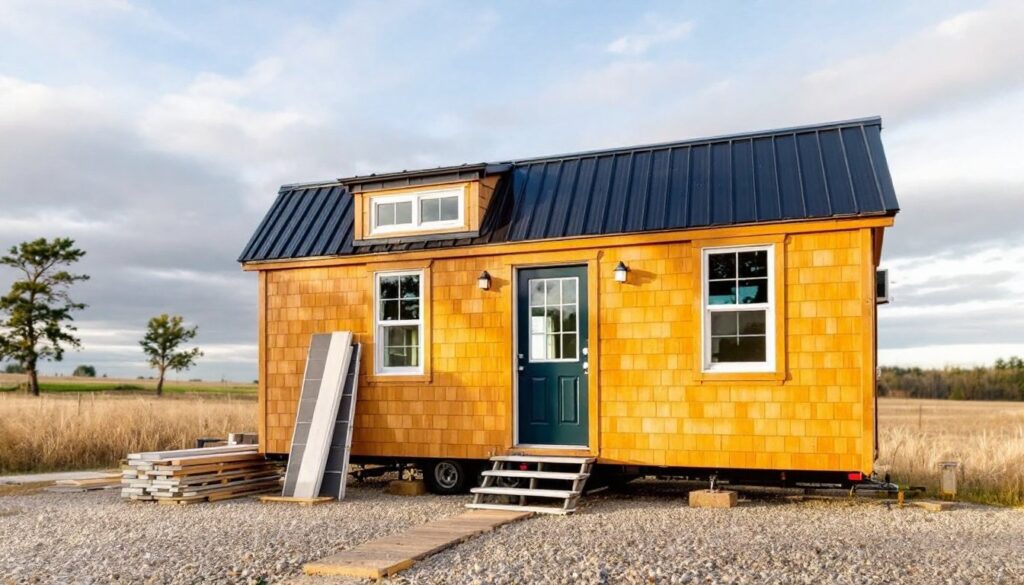
ToggleA 12×32 tiny house delivers 384 square feet of carefully planned living space, enough for a full kitchen, bathroom, sleeping loft, and living area without the overwhelming commitment of a traditional home. This footprint hits a sweet spot: it’s large enough to feel livable year-round but compact enough to potentially avoid some building restrictions that apply to bigger structures. Whether someone’s looking to downsize, build a backyard ADU, or create an off-grid retreat, the 12×32 layout offers real flexibility. But getting it right means understanding zoning rules, maximizing every inch, and making smart choices about framing, utilities, and finishes.
Key Takeaways
- A 12×32 tiny house provides 384 square feet of livable space with a practical layout that fits standard building materials and may qualify for simplified zoning permits.
- The 12-foot width complies with highway towable regulations and standard roof trusses, while the 384-square-foot footprint often stays below ADU thresholds that vary by jurisdiction.
- Ceiling height, framing strategy (2×6 exterior walls for better insulation), and strategic window placement directly impact livability and energy efficiency in your 12×32 design.
- Common layout options include open studio, loft-plus-bedroom, or dual-loft configurations, with ship’s ladders offering safer daily access than straight ladders in tight spaces.
- Building codes require permits for plumbing, electrical, and permanent foundations; verify local regulations and egress requirements (like 5.7-square-foot emergency windows) before construction.
- A DIY 12×32 tiny house costs $20,000–$35,000 without professional labor, while hiring contractors ranges $50,000–$70,000; hybrid approaches combining owner framing with professional mechanical systems balance cost savings and code compliance.
Why the 12×32 Footprint Is Perfect for Tiny House Living
The 12×32 dimension works because it aligns with standard building materials and trailer sizes. A 12-foot width fits highway regulations for towable tiny homes without requiring an oversize load permit in most states. For foundation-built structures, 12 feet matches standard roof truss spans and minimizes lumber waste, dimensional lumber like 2x6s and 2x8s are sold in even-foot increments, and plywood sheathing comes in 4×8 sheets.
At 384 square feet, this size often stays below the 400-square-foot threshold that some jurisdictions use to classify accessory dwelling units (ADUs) or outbuildings differently from primary residences. That can mean simpler permitting, lower impact fees, or exemptions from certain code requirements, though this varies widely by location.
The layout supports a practical tiny house floor plan: a main living area (roughly 12×16), a full bathroom (5×8), a galley kitchen (8-10 linear feet of counter), and a sleeping loft over the bathroom. Some builders split the 32-foot length into two distinct zones, social space up front, private quarters in back, with a narrow hallway or partial wall dividing them. It’s tight, but not claustrophobic if designed well.
Essential Design Considerations for Your 12×32 Tiny House
Start with ceiling height. Most tiny houses on trailers max out around 13’6″ total height to stay road-legal, leaving about 6’6″ to 7′ of interior headroom after accounting for floor thickness, roof assembly, and trailer deck height. Foundation builds have more freedom, 9- to 10-foot ceilings in the main living area make the space feel dramatically larger and allow for taller loft sleeping areas with actual headroom instead of crawl space.
Framing choices matter more in tiny houses than conventional builds because every inch counts. Standard 2×4 walls are fine for non-load-bearing partitions, but exterior walls often benefit from 2×6 framing to accommodate thicker insulation (R-19 to R-21 batts vs. R-13). That extra two inches of wall thickness eats into floor space but pays off in energy efficiency, especially if the structure will be used year-round.
Window and door placement directly affects furniture layout. A front door on the 12-foot end wall (typically 36″ wide) leaves the long sidewalls open for cabinetry, appliances, and seating. Avoid centering windows symmetrically just for looks, place them where they’ll actually light work surfaces, frame views, or provide cross-ventilation. Casement or awning windows work better than double-hung in tight spaces: they open fully and don’t block counter space when propped.
Utilities require upfront planning. In a typical tiny house frame, electrical runs, plumbing chases, and HVAC ducts need to be mapped before sheathing goes on. A single mini-split heat pump (12,000 BTU) handles heating and cooling for 384 square feet efficiently, but the condenser unit needs exterior clearance and the wall-mounted head unit takes up valuable interior wall space. Locate it where it won’t blow directly on seating or the bed.
Layout Options That Make the Most of 384 Square Feet
Three common layout strategies work for 12×32 tiny house floor plans:
Open studio layout: No interior walls except around the bathroom. Kitchen along one long wall, living/sleeping area on the other. A Murphy bed or sleeper sofa keeps the main space flexible. Works best for one person or a couple without kids.
Loft + main floor bedroom: Sleeping loft over the bathroom (or kitchen) with a ground-floor bedroom or flex space in the back third of the house. This approach adds privacy and works for families or when resale value matters, future buyers hesitate at climbing a ladder every night.
Dual loft: Two sleeping lofts at opposite ends, bathroom and kitchen in the middle. Maximizes sleeping capacity (up to four people) but sacrifices some main-floor living space. Common in vacation cabins or guest houses.
Staircase vs. ladder is a real decision. A ship’s ladder (alternating tread stairs) takes up about 3 feet of floor space but provides safer, more comfortable access to lofts. Storage drawers built into stair risers reclaim some of that lost square footage. Straight ladders are cheap and space-efficient but impractical for daily use, especially for kids or older adults.
Building Codes and Zoning Requirements for 12×32 Structures
Zoning and building codes vary drastically, so verify local rules before buying materials. In many municipalities, structures under 200 square feet are classified as sheds or storage buildings and don’t require permits, but add plumbing, sleeping quarters, or a kitchen and the same square footage becomes a dwelling subject to full IRC (International Residential Code) compliance.
A 384-square-foot 12×32 house almost always requires permits if it includes:
- Permanent foundation (piers, slab, or crawl space)
- Electrical service (even if solar with battery backup)
- Plumbing with waste lines connected to septic or sewer
- Sleeping or cooking facilities
Key code considerations for a legal tiny house:
Foundation: Frost-protected shallow foundations or helical piers work in many climates and cost less than full perimeter footings. Some jurisdictions allow tiny houses on trailers to remain titled as RVs, bypassing building codes entirely, but they may restrict where and how long they can be parked.
Egress: Every sleeping room needs an emergency exit. Lofts with less than 70 square feet of floor area are exempt from egress window requirements under IRC R310, but anything larger needs a window with a minimum 5.7-square-foot opening, at least 24″ high and 20″ wide, with a sill no more than 44″ above the floor.
Ceiling height: IRC R305 requires 7-foot ceilings in habitable rooms. Lofts and bathrooms can go as low as 6’8″, and areas under sloped ceilings (like lofts) only need 50% of the floor area at full height.
Stairways: If the loft qualifies as a sleeping room, IRC R311.7 requires stairs with 7.75″ max rise and 10″ min tread, tight but doable. Alternating tread stairs are allowed under R311.7.5.1 if the loft is under 200 square feet and serves only one dwelling unit.
Some builders sidestep residential codes by certifying their tiny house as an RV through RVIA or building to the NOAH (National Organization of Alternative Housing) standard. This works if the house will be mobile and parked in RV-friendly zones, but limits financing and insurance options.
Cost Breakdown: What to Expect When Building a 12×32 Tiny House
Material costs for a basic 12×32 shell (framing, sheathing, roofing, windows, and exterior doors) run roughly $8,000 to $12,000 depending on regional lumber prices and finish choices. That assumes:
- Pressure-treated 4×6 skids or concrete piers for foundation
- 2×6 wall framing 16″ on center
- 7/16″ OSB sheathing and Tyvek house wrap
- Architectural shingle roofing over 1/2″ plywood decking
- Two or three double-pane vinyl windows
- One exterior door (steel or fiberglass)
Interior finishes add another $6,000 to $10,000:
- Drywall or tongue-and-groove paneling for walls and ceilings
- Vinyl plank or laminate flooring (avoid carpet in small spaces, it traps odors)
- Basic kitchen cabinets (IKEA or stock units work fine)
- Bathroom vanity, toilet, and shower pan
- Interior doors and trim
Mechanical systems (HVAC, plumbing, electrical) typically cost $5,000 to $8,000 for a simple setup:
- 12,000 BTU mini-split or through-wall heat pump
- PEX plumbing with a tankless water heater or small electric tank
- 100-amp electrical panel with basic circuits (some tiny houses get by with 50-amp RV-style service)
Appliances and fixtures vary wildly based on taste. A contractor-grade kitchen (apartment-size fridge, two-burner cooktop, compact dishwasher) runs $1,200 to $2,000. Splurging on high-end compact appliances can double that.
Total DIY build cost for a livable 12×32 tiny house: $20,000 to $35,000 depending on finishes and whether utilities are DIY or contracted. Hiring out all framing, electrical, and plumbing pushes the total closer to $50,000 to $70,000. Kit homes (pre-cut framing packages) split the difference, costing $25,000 to $40,000 with moderate DIY labor.
Don’t forget site prep, permits, and utility hookups. Septic system or sewer tap fees alone can add $3,000 to $10,000 in some areas.
Interior Design Tips to Maximize Space and Functionality
Vertical storage is non-negotiable. Upper cabinets should run to the ceiling, the gap above standard 30″ cabinets is wasted space. Use that top foot for seasonal items or things accessed rarely. Open shelving feels airy but requires disciplined editing: closed cabinets hide clutter better.
Multi-function furniture saves square footage. A dining table that folds against the wall, a sofa with storage underneath, or a desk that converts to a Murphy bed all earn their keep. Avoid bulky recliners or oversized sectionals, they dominate small rooms.
Light colors and reflective surfaces make 384 square feet feel larger. White or pale gray walls bounce light around. Glossy tile backsplashes and mirrors amplify the effect. Dark accent walls can work but use them sparingly, one feature wall, not four.
Lighting layers matter. A single overhead fixture creates harsh shadows. Combine recessed LED cans (or surface-mount pucks in a wood ceiling), under-cabinet task lights in the kitchen, and a floor or table lamp in the living area. Dimmer switches let occupants adjust mood and brightness.
Built-ins beat freestanding furniture in tight layouts. A custom built bench with storage underneath fits odd corners perfectly and doesn’t leave wasted gaps. Built-in desks, nightstands, and window seats make a 12×32 tiny house feel intentional, not cramped.
Keep pathways at least 30 inches wide, any narrower and moving furniture or carrying groceries becomes a frustration. In galley kitchens, 36″ to 42″ between facing counters allows cabinet doors and appliances to open without blocking traffic.
DIY vs. Professional Build: Which Path Is Right for You?
A 12×32 tiny house is within reach for intermediate DIYers with framing experience, but it’s not a first-time project. Expect 400 to 600 hours of labor if building solo, spread over several months. That assumes familiarity with layout, cutting rafters, running electrical in code-compliant ways, and plumbing basics.
DIY makes sense if:
- The builder has framed a shed, deck, or addition before
- Time isn’t urgent (weekends and evenings over 6-12 months)
- Local codes allow owner-builder permits
- Friends or family can help with heavy lifts (setting roof trusses, moving sheathing)
Hire a pro for:
- Electrical service panel and main runs (unless the builder holds a license)
- Septic or sewer tie-ins (permit and inspection required in most areas)
- Roofing if working at height is uncomfortable, falls cause serious injuries
- Spray foam insulation (closed-cell requires specialized equipment and safety gear)
Hybrid approach: Many builders frame the shell themselves and subcontract mechanical systems. This captures most of the cost savings (framing labor is 30-40% of a professional build) while ensuring plumbing and wiring pass inspection on the first go.
Tool requirements for a DIY 12×32 build:
- Circular saw and miter saw (a sliding 10″ miter saw handles 2×6 cuts)
- Framing nailer (pneumatic or cordless, rent if not owning)
- Drill/driver and impact driver
- 4-foot level, speed square, and 25-foot tape measure
- Reciprocating saw for cuts in tight spots
- Table saw or track saw speeds up ripping plywood and OSB
Safety gear: Safety glasses, work gloves, hearing protection for power tools, and a dust mask or respirator when cutting treated lumber or working with insulation. Rent scaffolding or use sturdy planks across sawhorses when working overhead, ladders cause more job-site injuries than any other tool.
Permit inspections typically happen at foundation, framing, rough-in (before drywall), and final. Schedule them early and don’t cover work until it’s signed off. Inspectors appreciate builders who ask questions upfront rather than trying to hide mistakes.